参考链接
Ubuntu 快速安装node、npm、git 等依赖的基础工具命令
sudo apt-get upgrade
sudo apt-get install nodejs
sudo apt-get upgrade nodejs
sudo apt-get install npm
sudo apt-get upgrade npm
sudo apt-get install git
临时增大git http 缓冲区,这个方法能解决因缓冲区不足导致的克隆中断问题
# 增大 Git HTTP 缓冲区到 500MB(根据需要调整)
git config --global http.postBuffer 524288000

# 同时设置超时时间(单位:秒),避免网络慢导致超时
git config --global http.lowSpeedLimit 0
git config --global http.lowSpeedTime 999999
使用npm 安装openclaw
sudo npm install -g openclaw@latest
安装的过程中可能出现报错
npm ERR! code ELIFECYCLE
npm ERR! errno 1
npm ERR! @whiskeysockets/baileys@7.0.0-rc.9 preinstall: `node ./engine-requirements.js`
npm ERR! Exit status 1
npm ERR!
npm ERR! Failed at the @whiskeysockets/baileys@7.0.0-rc.9 preinstall script.
npm ERR! This is probably not a problem with npm. There is likely additional logging output above.
Baileys( WhatsApp 相关库)通常对 Node.js 版本有严格要求(比如需要 Node.js 18+,甚至 20+),也可能检查系统依赖(如 libgbinder、protobuf 等)。
可以执行下面的命令升级版本
# 安装 nvm(Node 版本管理器)
curl -o- https://raw.githubusercontent.com/nvm-sh/nvm/v0.39.7/install.sh | bash

# 重启终端后,安装 Node.js 20 LTS
nvm install 20
nvm use 20

# 验证版本
node -v  # 应输出 v20.x.x
npm -v   # 应输出 9.x+ 或 10.x+
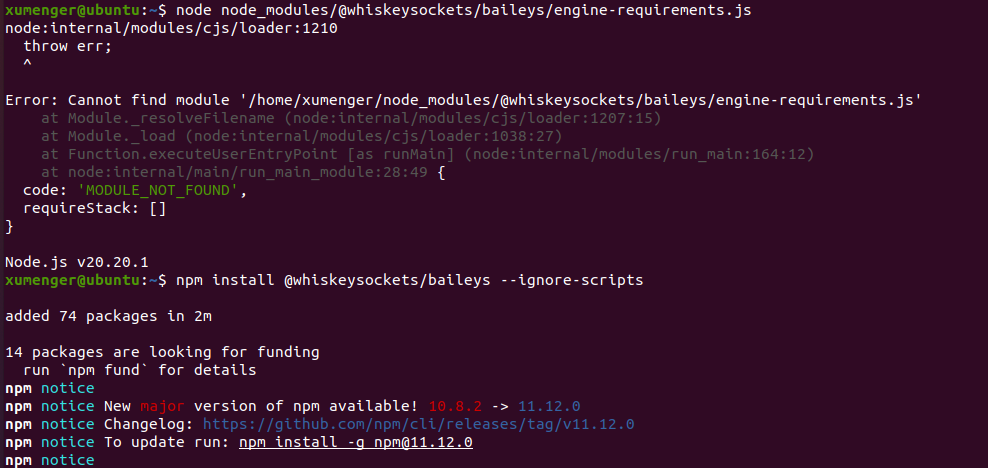
然后安装还是上面的报错,然后执行下面的命令查看原因
# 直接运行预安装脚本,查看详细错误
node node_modules/@whiskeysockets/baileys/engine-requirements.js
# 如果上面的命令提示文件不存在,先临时安装(忽略脚本):
npm install @whiskeysockets/baileys --ignore-scripts
执行第二个命令的时候,出现报错,需要升级npm 版本
升级npm 版本后,安装Baileys的底层依赖,重新安装
npm install -g npm@11.12.0

# Ubuntu/Debian 完整依赖包
sudo apt update && sudo apt install -y \
  build-essential \
  python3 \
  make \
  g++ \
  libgbinder-dev \
  libprotobuf-dev \
  protobuf-compiler \
  git \
  curl \
  wget

# 出现报错:Unable to locate package libgbinder-dev
# 先安装编译依赖
sudo apt update
sudo apt install -y build-essential git libglib2.0-dev dpkg-dev fakeroot
# 克隆源码
git clone https://github.com/waydroid/libglibutil.git
cd libglibutil
# 安装编译依赖
sudo apt build-dep .
# 编译并打包
dpkg-buildpackage -b -uc -us
# 回到上级目录,安装生成的 deb 包
cd ..
sudo apt install -y ./*.deb
# 克隆源码
git clone https://github.com/waydroid/libgbinder.git
cd libgbinder
# 安装编译依赖
sudo apt build-dep .
# 编译并打包
dpkg-buildpackage -b -uc -us
# 回到上级目录,安装生成的 deb 包
cd ..
sudo apt install -y ./*.deb

# 验证安装结果
pkg-config --modversion libgbinder  # 输出版本号即成功
ls /usr/lib/x86_64-linux-gnu/libgbinder.so  # 有文件即成功


# 重新安装openclaw
sudo npm install -g openclaw@latest
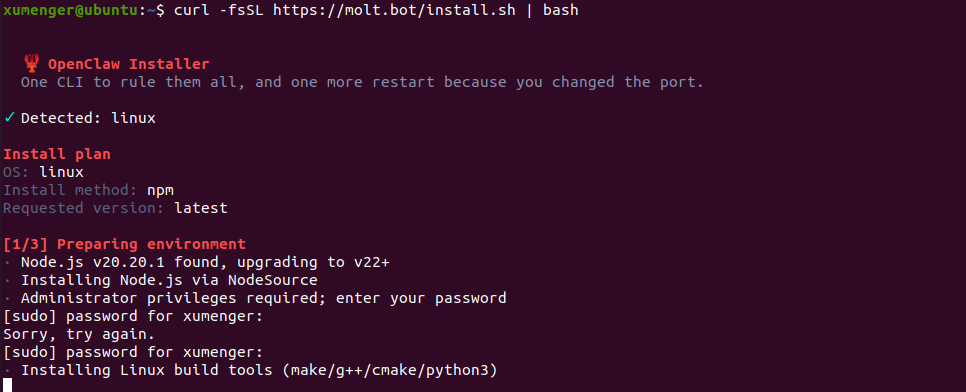
换一种方式安装
使用官方提供的一键安装脚本进行部署:
nvm install 22
nvm use 22
nvm alias default 22
curl -fsSL https://molt.bot/install.sh | bash
完整安装向导 + 安装系统服务
openclaw onboard --install-daemon
按照指示一路安装,注意配置模型这一步,暂时先选择MiniMax
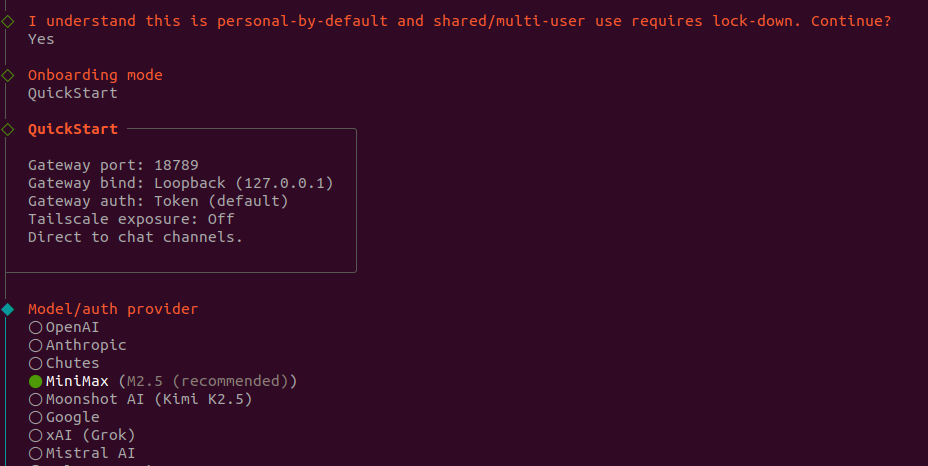
可以选择的大模型如下:
- MiniMax https://www.minimaxi.com → 控制台 → API Keys
- 智谱 AI https://bigmodel.cn → 控制台 → API Keys
其他的内容也都先跳过,后续需要用到的时候再设置
简单使用
重启 Gateway
openclaw gateway restart
通过http://127.0.0.1:18789/chat?session=main 可以试用
比如需要更换大模型,或者更换API Key,可以重新执行,重新设置,并重启Gateway Service
openclaw onboard
openclaw gateway restart
可以试着去和OpenClaw 进行对话:
我希望通过我的Windows 电脑的浏览器访问Ubuntu 上的OpenClaw,OpenClaw 默认仅绑定 127.0.0.1(loopback),只能本机访问。需改为 lan(0.0.0.0)以监听所有网卡。
# 查看当前网关配置
openclaw config get gateway

# 设置为局域网可访问(监听 0.0.0.0)
openclaw config set gateway.bind lan

# 可选:修改端口(默认 18789)
# openclaw config set gateway.port 18789

openclaw config set gateway.controlUi.allowedOrigins '["*"]'

# 重启网关使配置生效
openclaw gateway restart
设置通过HTTPS 访问
# 创建证书目录
mkdir -p ~/.openclaw/certs
cd ~/.openclaw/certs

# 生成自签名证书(一路回车,无需填写额外信息)
openssl req -x509 -newkey rsa:4096 -keyout key.pem -out cert.pem -days 365 -nodes

# 设置 HTTPS 证书路径
openclaw config set gateway.tls.enabled true
openclaw config set gateway.tls.cert ~/.openclaw/certs/cert.pem
openclaw config set gateway.tls.key ~/.openclaw/certs/key.pem

# 重启网关
openclaw gateway restart
先查看当前网关的令牌
# 查看当前网关令牌
openclaw config get gateway.auth.token

# 如果没有令牌(输出 null/undefined),生成一个新令牌
openclaw config set gateway.auth.token "$(openssl rand -hex 16)"
在~/.openclaw/openclaw.json 中可以找到token
"auth": {
      "mode": "none",
      "token": "c5e02ced942d746e02c35f5840852d9c"
    }
然后在Windows 上就可以通过[https://192.168.6.128:18789(https://192.168.6.128:18789) 来访问并使用OpenClaw 了,输入token 即可访问
如果访问的时候出现pairing required 报错,则
openclaw devices list
预期输出
┌──────────────────────────────────────┬──────────────┬─────────────────────┐
│ Request ID                           │ Role         │ Created At          │
├──────────────────────────────────────┼──────────────┼─────────────────────┤
│ 4f9db1bd-a1cc-4d3f-b643-2c195262464e │ browser      │ 2026-02-11 12:22:01 │
│ b2f8c1de-9b4a-4e7c-8d21-3f5a9b7c2e1f │ node         │ 2026-02-11 14:14:40 │
└──────────────────────────────────────┴──────────────┴─────────────────────┘
复制你要批准的 Request ID(例如 4f9db1bd-a1cc-4d3f-b643-2c195262464e),执行:
openclaw devices approve 4f9db1bd-a1cc-4d3f-b643-2c195262464e
此时返回浏览器/客户端,错误应立即消失,连接自动恢复。
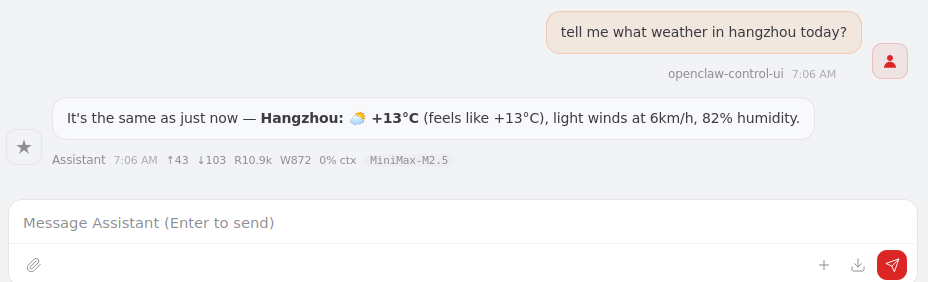
然后就可以使用OpenClaw 了,比如我问他:明天杭州的天气怎么样